Cartridge Installation and Setup: Do It Right, and Then Do It Right Again
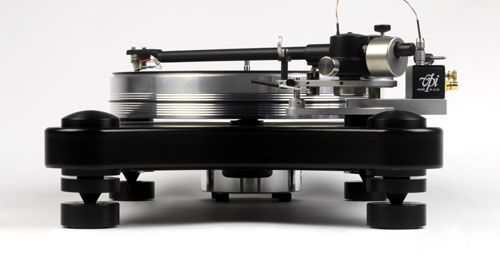
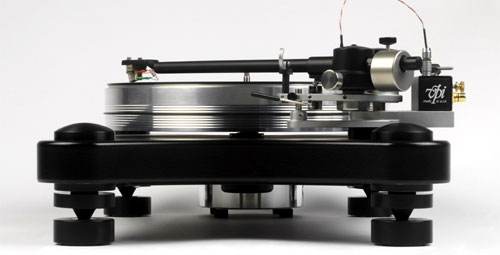
The sheer variety of options is remarkable, so make sure you read the manual carefully as incorrect operation could cause damage. An excellent case in point is the VPI Traveler 'arm used in the pictures in this section. This slides a fixed weight onto a carrier that is then adjusted using a knurled winder. It’s an excellent and extremely precise mechanism. But if you don’t realize how it works and try to force or twist the counterweight to adjust it, you could easily wreck the 'arm’s precision bearings. So always take the time to make sure you understand exactly how the 'arm works.
Mounting the cartridge – This needs to be done with considerable care to avoid damaging not just the cartridge but the tonearm too. If the 'arm is supplied separately, then install the cartridge before mounting the 'arm on the deck. If the 'arm is already mounted but can easily be removed, then that is well worth considering. If the 'arm is fixed in place, then make sure that it is secured in its rest, using a releasable zip tie or similar (the paper/wire twist strips that close freezer bags will also work) if necessary. Always avoid pulling on the headshell or twisting the 'arm against its bearings. The cartridge requires two sets of connections: the wiring from the tonearm and the physical attachment to the headshell itself. Start with the small wires that protrude from the end of the 'arm. These should be color coded, as should the pins on the rear of the cartridge, although sometimes these are labeled instead, with small letters and symbols molded into the rear plate of the body. Just in case, the coding should be as follows.
With the stylus guard in place, offer up the cartridge to the tonearm and connect the wires. Each wire is terminated with a small clip that should push over the corresponding pin. Use your needlenose pliers and be careful -- it is easy to break a clip if you force it. Likewise, hold it too tightly and you can crimp it flat. Take it gently and check for fit. If the clips slip on easily, then everything is fine. If they are loose you will need to gently crimp them up a bit. If they are too tight and won’t slip on, use a screwdriver blade to open them slightly. These days, many manufacturers use spring-loaded clips that self adjust, making life considerably easier. Once the headshell wires are attached it is time to fix the cartridge into the headshell slots. This normally requires the use of small allen bolts, generally supplied with the cartridge, but often with the 'arm also. Cartridge bodies are usually threaded to accept 2.5mm bolts directly, but some use different thread sizes (with supplied bolts in the correct thread), while others are not threaded and require the use of nuts and bolts to secure them. It always looks neatest if the bolt-heads are above the headshell, but sometimes that’s simply not possible. If your patience is wearing thin, consider running the bolts up from below and attaching the nuts from above. Washers between bolt heads (or nuts) and the headshell will prevent marking or pitting of the slots and make small adjustments easier. Always avoid using longer bolts than necessary. Once both bolts are in place, position the cartridge roughly in the center of the slots and tweak the fixings up to hold it gently in place. Remember, you are going to have to adjust its position, so tightening the bolts is a waste of time. If you have been mounting the cartridge without having the 'arm on the deck, now you can (re)install it and, with the stylus guard in place, and set the height approximately. Setting tracking weight/downforce – Once the 'arm is in place with the cartridge mounted, it is time to set the tracking force using your stylus balance (or the technique defined by the manufacturer). The normal approach is to install the counterweight and, removing the stylus guard, set it so that the 'arm is in a position of neutral balance -- floating level. Don’t forget to make sure that the cueing mechanism is in the down position and to protect the stylus from crashing into the platter. If the 'arm keeps drifting outwards, away from the platter, you probably haven’t disabled the bias mechanism. Once you are in a position of neutral balance, in most cases you will move the counterweight towards the bearing (sliding, twisting or adjusting as appropriate), to apply downforce. Do this gradually and use your stylus balance to check progress until you have a feel for it. The stylus balance should be positioned on the platter and as near the height of the record surface as possible. In some cases removing the mat from the platter can help in this respect. Always remember that the 'arm will be free to move in any direction and that your stylus and cantilever are unprotected, so avoid sudden movements or you risk pinging the 'arm sideways and decapitating your cartridge. Slow and steady is the way.
Replace the platter mat if you’ve removed it. Now, place a record (preferably one you don’t value too highly) on the platter and with the needle resting in a stationary groove, check that the 'arm is horizontal. If not, adjust accordingly, lifting the 'arm using the cueing mechanism before you do so. While some 'arms have a Vernier-type knob that allows easy adjustment of 'arm height, most still use spacers (Rega) or a simple locking collar. If your 'arm needs spacers, then these must be inserted by removing and reinstalling the 'arm itself, although if you have bought a record player/cartridge package that uses a Rega-type 'arm, then the correct spacer should already be installed. Tonearms with locking collars normally use a single allen bolt, inserted through the side of the collar to clamp the sliding column. Make sure that you support the 'arm when loosening the bolt, and don’t overtighten after adjustment. Be prepared to repeat the operation several times in order to get the height right. If in doubt, use a simple paper gauge to judge the height of the 'arm where it crosses the edge of the record, compared to the height nearer the headshell. You can make this gauge yourself using the blank back of a business card with reference lines marked along one edge. Some modern 'arms (such as the SMEs) use tapered armtubes but these normally have a reference line along their midpoint to help set the 'arm level.
With the 'arm level and the cartridge loosely fixed at the midpoint in the headshell slots, you’ve reached your initial position. Now comes the fiddly bit. Using the alignment protractor – Alignment protractors come in two basic types: single point and double point. The technique for each is different, so select the appropriate instructions below and proceed accordingly. If in doubt, take a look at the images below to help sort out what type you have. But before proceeding, there are two vital considerations that apply to using any single-point or universal protractor.
|
 nce the record player is
sited, leveled and you are sure that the various elements necessary for hooking up the
record player are in place, it’s time to mount and align the cartridge. But before
grasping your allen keys in one hand and your cartridge in the other, there are a few
preliminaries that are worth running through. The first and most obvious is to make sure
that you’ve got all the tools you’ll need in hand. Check that the working area
is really well lit, maybe placing an extra angle-poise lamp if necessary. Finally and most
importantly, make sure that you are familiar with the various adjustments and operations
of the tonearm. That might sound obvious, but it ain’t necessarily so.
nce the record player is
sited, leveled and you are sure that the various elements necessary for hooking up the
record player are in place, it’s time to mount and align the cartridge. But before
grasping your allen keys in one hand and your cartridge in the other, there are a few
preliminaries that are worth running through. The first and most obvious is to make sure
that you’ve got all the tools you’ll need in hand. Check that the working area
is really well lit, maybe placing an extra angle-poise lamp if necessary. Finally and most
importantly, make sure that you are familiar with the various adjustments and operations
of the tonearm. That might sound obvious, but it ain’t necessarily so. Some Rega 'arms have a
screw thread for the counterweight, and others simply slide it into position. Most
unipivots will have a sliding eccentric arrangement. The SMEs use a fixed weight on a
threaded carrier, combined in the case of the Model V with a dynamic balance arrangement,
a spring that applies tracking force via a dial -- also found on the top Rega and Linn
'arms.
Some Rega 'arms have a
screw thread for the counterweight, and others simply slide it into position. Most
unipivots will have a sliding eccentric arrangement. The SMEs use a fixed weight on a
threaded carrier, combined in the case of the Model V with a dynamic balance arrangement,
a spring that applies tracking force via a dial -- also found on the top Rega and Linn
'arms.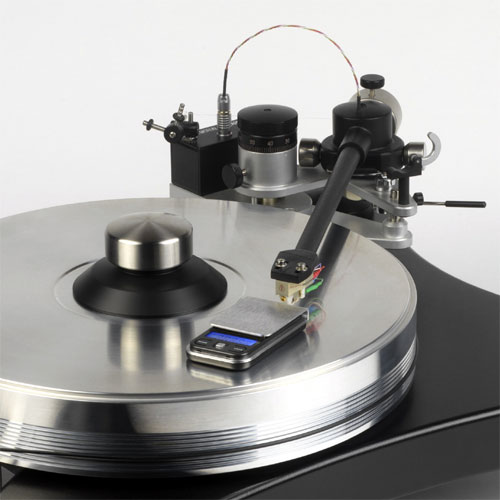 How much downforce do you need? That will normally be defined in the
cartridge specs, within a specific range, generally between 1.5 and 2.0 grams -- although
some cartridges track considerably heavier than this. The Clearaudio Goldfinger Statement
requires around 2.7 grams of downforce, so read the instructions for your cartridge
carefully. Normally they will define a range of around ±0.1 gram. Set a median value, so
if the suggested range 1.7–1.9 grams, set initial tracking force at 1.8 grams.
How much downforce do you need? That will normally be defined in the
cartridge specs, within a specific range, generally between 1.5 and 2.0 grams -- although
some cartridges track considerably heavier than this. The Clearaudio Goldfinger Statement
requires around 2.7 grams of downforce, so read the instructions for your cartridge
carefully. Normally they will define a range of around ±0.1 gram. Set a median value, so
if the suggested range 1.7–1.9 grams, set initial tracking force at 1.8 grams.